Simple Racer
This tutorial will show you how to create a top down racing game, you will create a track, and your car will be able to complete a lap, time the lap, and potentially to complete a set number of laps. It will also cover simple AI to make the a ghost car drive around your circuit.
You could go on to learn about adding traction or skidding, adding collectables or weapons
Contents
Creating the Map
Tiled
You will firstly need to install the Tiled program from the website and link below. In college the Tiled executeables are on moodle, under project, technical skill, monogame, and tiled. I have also added links to other tutorials for using Tiled.
Tiled Website and Download
Tutorials for using Tiled
Written Version of Above Tutorials
Create a Map in Tiled
Map Settings
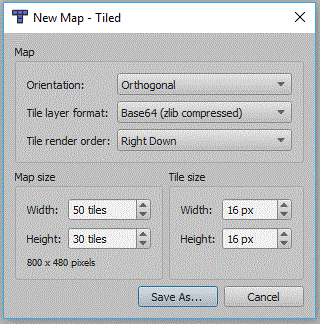
You will need to create a new map in tiled, the settings window below should be displayed:
The Tile size will need to match the tile size of your tileset. You can also specify the number of tiles in your your map, this and the tile size will create a map of a given size in pixels. The tiles i will use are 128 x 128 pixels, this will create quite a large map but we are only going to show the area around the car and not the whole map at once. You should be able to leave everything else the same.
You should now have an empty map, later on we will use Square.Tiled to draw the map this only supports maps in the Base64 GZIP format. So in the properties panel set the Tile Layer Format to Base64 (gzip compressed):
File:Tiled compression setting.gif
The map itself
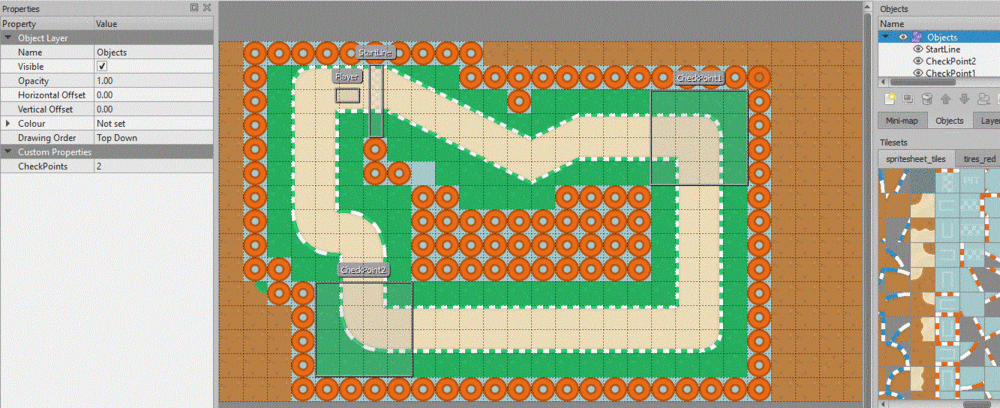
I have created a map with 3 different tile layers, one for the collision which includes all of the tyres, a track layer which only contains the track peices, and a layer for the mud or grass for the background.
I have also created an object layer with the players starting location, the 2 check points and the start line all stored as objects. I have also created a custom property for the number of checkpoints (this may change depending on the track).
MonoGame Project
Create a new MonoGame project, mine is a Windows project.
Setup Square.Tiled
If you have a project ready, create a new class in your project. Click project and new class and call it Tiled.cs, then copy the code from this document over the code in your new class: Square.Tiled Class
Remember to set the name space to Squared.Tiled.
You will need to add references in the using section for the following:
using System.IO;
using Squared.Tiled;
While you add those you may as also add the following for the use of List later:
using System.Collections.Generic;
Code to Display Map
Map Variables
At the top of your Game1 class add these additional variables:
Map map;
Layer collision;
Vector2 viewportPosition;
int tilepixel;
Game1 constructor
I have set the width and height in the constructor:
        public Game1()
        {
            graphics = new GraphicsDeviceManager(this);
            Content.RootDirectory = "Content";
            graphics.PreferredBackBufferWidth = 1280;
            graphics.PreferredBackBufferHeight = 720;
        }
LoadContent for map
In the LoadContent method add the following lines to load the map, the collision layer and to set the texture of the player. The variable tilepixel assumes your tiles are square, the number of pixels is taken from the map:
map = Map.Load(Path.Combine(Content.RootDirectory, "SimpleRacer.tmx"), Content);
collision = map.Layers["Collision"];
tilepixel = map.TileWidth;
viewportPosition = new Vector2(map.ObjectGroups["Objects"].Objects["Player"].X - 640, map.ObjectGroups["Objects"].Objects["Player"].Y-360);
The Draw Method
Add the following to the draw method to draw the map and hero to the screen.
If you already have spriteBatch.Begin() or spriteBatch.End() then just place the middle line inbetween your lines.
spriteBatch.Begin();
map.Draw(spriteBatch, new Rectangle(0, 0, GraphicsDevice.Viewport.Width, GraphicsDevice.Viewport.Height), viewportPosition);
spriteBatch.End();
At this point your project should run an display your map centered onto the player location.
The Car
Create a new class in your project and call it Car.cs.
We will need to add the following to the using section of your new class:
using Microsoft.Xna.Framework;
using Microsoft.Xna.Framework.Graphics;
using Microsoft.Xna.Framework.Input;
using System;
using System.IO;
using System.Collections.Generic;
Now in the Car class declare the following variables:
        Texture2D texture;
        Texture2D tyre;
        Vector2 position;
        Vector2 origin;
        float steer =0;
Now we need to create an init method to set up the car. This accepts the texture, position of the car and also calculates the origin point of the car (we will use this to rotate the car):
        public void Init(Texture2D t,  Vector2 pos)
        {
            position = pos;
            texture = t;
            origin = new Vector2(t.Width / 2, t.Height / 2);
        }
Now create a new method called GetInputs, this is used to control the car. It accepts the KeyboardState, which is checked for the key pressed. If the left arrow is pressed we are going to minus 0.05 from the current steer value. If the right arrow is pressed we are going to ad 0.05 onto the steer value:
        public void GetInputs(KeyboardState input)
        {
            if (input.IsKeyDown(Keys.Left))
            {
                steer -= (.05f);
            }

            if (input.IsKeyDown(Keys.Right))
            {
                steer += (.05f);
            }
        }
Now create an Update method, it needs to accept the gameTime passed, the only code you need inside is to run the CheckInputs method above:
        public void Update(GameTime gameTime)
        {
            GetInputs(Keyboard.GetState());

        }
Finally we need to add a Draw method. This is more complex than before because we need to rotate the texture.
        public void Draw(SpriteBatch spriteBatch)
        {
            spriteBatch.Draw(texture, center,null,null,center,steer,null,null,SpriteEffects.FlipHorizontally,0);
        }
    }
Create a car in Game1
Add the following lines to declare your car, this should be just after "Class Car{" :
        Texture2D cartexture;
        Car car;
Now in LoadContent add the following to create the car itself:
            cartexture = Content.Load<Texture2D>("car");
            Vector2 carPos = new Vector2((graphics.PreferredBackBufferWidth/2)-(cartexture.Width/2),
                (graphics.PreferredBackBufferHeight / 2)-(cartexture.Height/2));
            car = new Car();
            car.Init(cartexture, carPos);
in the Update method of Game1.cs add the following to update the car:
car.Update(gameTime);
Finally we need to add the following line to draw the car, make sure it goes after the line to draw the map but before the spriteBatch.End():
car.Draw(spriteBatch);
If you test it now, your car should be in the center and it rotates with the arrow keys.
Adding forward & backward inputs
Within your Car class add a new variable for speed:
float speed = 0;
Now in your GetInputs method add the following to handle the Up and Down arrow. This can go after your code to handle the steering input. The AND section of each if statement is to set a maximum speed. The if statement is to bring the car to a halt if nothing is pressed:
            if (input.IsKeyDown(Keys.Up) && speed < 15)
            {
                speed += 2;
            }

            if (input.IsKeyDown(Keys.Down) && speed > -15)
            {
                speed -= 1;
            }

            if (speed > 0)
                speed -= 1;
            else if (speed < 0)
                speed += .5f;
            else
                speed = 0;
Now in your update method add the following to update the position of the car. Remember we always draw the car in the center of the screen, this position should be within the map. This is a bit of complex maths, it is to essentially to find the length of a triangle sides based on the angle of steer and the length of the hypotenuse (speed):
position = position + new Vector2(speed * (float)Math.Cos(steer), speed * (float)Math.Sin(steer));
We are going to need get the position of the Car in the Game1.cs so that we can move the map to the right position. So in your Car class create a new property. This should be inside the class but not within any method:
        public Vector2 Position
        {
            get { return position; }
            set { position = value; }
        }
Now to move the map
In the LoadContent method in Game1.cs we need to change this line:
viewportPosition = new Vector2(map.ObjectGroups["Objects"].Objects["Player"].X - 640, map.ObjectGroups["Objects"].Objects["Player"].Y-360);
We want to use this to set the position of the car in the map instead, so change it to this. Make sure this line is after Car.Init():
car.Position = new Vector2(map.ObjectGroups["Objects"].Objects["Player"].X - 640, map.ObjectGroups["Objects"].Objects["Player"].Y-360);
Now in the Draw method for Game1.cs we need to use Car.Position to move the map so change this line:
map.Draw(spriteBatch, new Rectangle(0, 0, graphics.PreferredBackBufferWidth, graphics.PreferredBackBufferHeight), viewportPosition);
to this:
map.Draw(spriteBatch, new Rectangle(0, 0, graphics.PreferredBackBufferWidth, graphics.PreferredBackBufferHeight), car.Position);
Movement tweeks
Try your current movement, in reverse the steer directions need to be reversed, So the simple if statement below is used to set the value of swap, this is then used to multiply the steer value:
            int swap = 1;
            if (speed < 0)
                swap = -1;
Also we only want to rotate the car if the car is currently moving. change the following if statements:
            if (input.IsKeyDown(Keys.Left) && speed != 0)
            {
                steer -= (.05f * swap);
            }

            if (input.IsKeyDown(Keys.Right) && speed != 0)
            {
                steer += (.05f * swap);
            }

