Simple Beat Em Up
This will show you how to create a Beat Em Up game using a tiled map, and tile based collision detection. This will be a fighting game but you will walk around the scene fighting the enemies you encounter.
Contents
Create Map
Tiled
You will firstly need to install the Tiled program from the website and link below. In college the Tiled executeables are on moodle, under project, technical skill, monogame, and tiled. I have also added links to other tutorials for using Tiled.
Tiled Website and Download
Tutorials for using Tiled
Written Version of Above Tutorials
New Tiled Map
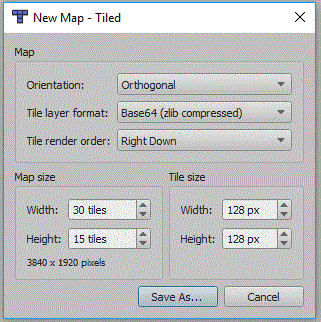
You will need a new tiled map, the tile size in the screen shot is 128 pixels, in the end i actually changed this to 16 x 16 and resized the tiles accordingly:
It is important to change the format of the map to Base64 gzip compressed:
File:Plat tile layer format.gif
Add Tile Set
Now your map is created we need to add a tile set:
In creating this tutorial i first tried a tileset based upon a collection of images, this seemed fine in Tiled but failed to draw using Square.Tiled. So make sure you choose embed and based on tileset image:
Draw Your Level
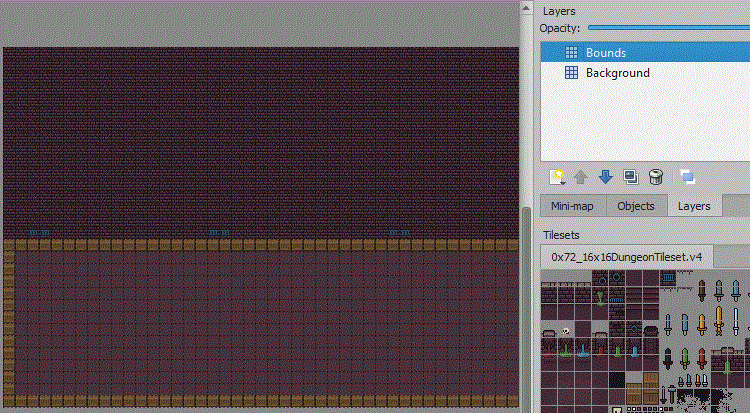
Now you have a tile set, it is time to build a simple map, I have created an area for my floor and above this is the wall area. These are in my background layer, and my Bounds layer is made up of the wooden style tiles to identify the bounds of the level. You should name your layers to something appropriate:
Add Player Object
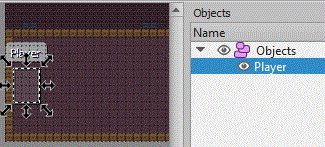
Now you have bounds and the background, we can now set the position of the player. This will also be the object moved by the code and player input. So insert an object layer, and then use the rectangle tool to create the object. My final player was 60 pixels high and 40 pixels wide:
MonoGame Project
Create a new MonoGame project, mine is a Windows project.
Setup Square.Tiled
If you have a project ready, create a new class in your project. Click project and new class and call it Tiled.cs, then copy the code from this document over the code in your new class: Square.Tiled Class
Or get it from GitHub: GitHub TRCCompSci tiled-xna
Remember to set the name space to Squared.Tiled.
You will need to add references in the using section for the following:
using System.IO;
using Squared.Tiled;
Code to Display Map
Map Variables
At the top of your Game1 class add these additional variables:
Map map;
Layer bounds;
Vector2 viewportPosition;
int tilePixel;
LoadContent for map
In the LoadContent method add the following lines to load the map, the bounds layer and to set the texture of the player. My map is called SimpleBeatEmUp.tmx you may have given yours a different name. My layer is called Bounds, again you may have given it a different name:
map = Map.Load(Path.Combine(Content.RootDirectory, "SimpleBeatEmUp.tmx"), Content);
bounds = map.Layers["Bounds"];
map.ObjectGroups["Objects"].Objects["Player"].Texture = Content.Load<Texture2D>("hero");
viewportPosition = new Vector2(0,0);
Remember to also add the png files for the hero, and the tileset for your map into the content pipeline.
The Draw Method
Add the following to the draw method to draw the map and hero to the screen.
If you already have spriteBatch.Begin() or spriteBatch.End() then just place the middle line inbetween your lines.
spriteBatch.Begin();
map.Draw(spriteBatch, new Rectangle(0, 0, GraphicsDevice.Viewport.Width, GraphicsDevice.Viewport.Height), viewportPosition);
spriteBatch.End();
At this point your project should run and display your map and the player.
Moving The Map
You will also need to update the viewportPosition. I want this to change in stages, so that you can walk around the screen and switch the viewportPosition when the player gets close to the end or start of the screen:
int xpos = map.ObjectGroups["Objects"].Objects["Player"].X;

int stage = 0;
if (xpos < 700)
    stage = 0;
else if (xpos < 1400)
    stage = 700;
else if (xpos < 2100)
    stage = 1400;

viewportPosition= new Vector2(stage,0);
I have chosen multiples of 700 because my screen width is 800 pixels.
Moving The Player
We can add the code below into the update method for Game1, it should probably go before the code above to move the map:
if (keyState.IsKeyDown(Keys.Left))
   map.ObjectGroups["Objects"].Objects["Player"].X -= 1;
if (keyState.IsKeyDown(Keys.Right))
   map.ObjectGroups["Objects"].Objects["Player"].X += 1;
if (keyState.IsKeyDown(Keys.Up))
   map.ObjectGroups["Objects"].Objects["Player"].Y -= 1;
if (keyState.IsKeyDown(Keys.Down))
   map.ObjectGroups["Objects"].Objects["Player"].Y += 1;
At this stage your map should display with the character also visible. The character should be able to move, try moving to the right it should change the position of your map accordingly.
Checking Bounds
We need to check if the player has moved out of bounds. We are therefore going to record the players position before any movement, then allow them to move, then check the bounds, and finally if they have moved out of bounds use the pre movement position to reset the current position.
This will require a new procedure:
public bool CheckBounds()
{

}
Inside the new procedure we need to declare a boolean, this will be used to return back from this method. We also need to create a rectangle for the player, this only covers the bottom 10 pixels of the texture:
bool check = false;

Rectangle playrec = new Rectangle(
   map.ObjectGroups["Objects"].Objects["Player"].X,
   map.ObjectGroups["Objects"].Objects["Player"].Y + (map.ObjectGroups["Objects"].Objects["Player"].Height - 10),
   map.ObjectGroups["Objects"].Objects["Player"].Width,
   10
);
Now we need 2 for loops to cycle through every tile on the map:
for (int x = 0; x < map.Width; x++)
{
   for (int y = 0; y < map.Height; y++)
   {

   }
}
Now inside the inner for loop we need to add the code to check the current tile. bounds.GetTile(x,y) will tell us the tile number from the tile set for the tile at postion x,y. If the tile number is 0 then no tile is present at x,y , if the tile number is not 0 then a tile is present at x,y. If a tile exists at x,y we then check to see if it intersects the player rectangle we have already created:
for (int x = 0; x < map.Width; x++)
{
   for (int y = 0; y < map.Height; y++)
   {
        if (bounds.GetTile(x,y) != 0)
        {
           Rectangle tile = new Rectangle(
             (int)x * map.TileWidth(),
             (int)y * map.TileHeight(),
             map.TileWidth(),
             map.TileHeight()
           );

           if (playrec.Intersects(tile))
              check = true;
           }
   }
}
Finally we need to add the code to return the value of check, you can see this in rhe completed CheckBounds procedure below:
        public bool CheckBounds()
        {
            bool check = false;

            Rectangle playrec = new Rectangle(
                map.ObjectGroups["Objects"].Objects["Player"].X,
                map.ObjectGroups["Objects"].Objects["Player"].Y + (map.ObjectGroups["Objects"].Objects["Player"].Height - 10),
                map.ObjectGroups["Objects"].Objects["Player"].Width,
                10
                );

            for (int x = 0; x < map.Width; x++)
            {
                for (int y = 0; y < map.Height; y++)
                {
                    if (bounds.GetTile(x,y) != 0)
                    {
                        Rectangle tile = new Rectangle(
                            (int)x * map.TileWidth(),
                            (int)y * map.TileHeight(),
                            map.TileWidth(),
                            map.TileHeight()
                            );

                        if (playrec.Intersects(tile))
                            check = true;
                    }
                }
            }

            return check;
        }
Using Check Bounds
Now the player should be able to move but still be contained by the bounds set. For example the screenshot below shows the character's feet should always stay within bounds:


